Barcelona

Týden už se konečně blíží ke svému konci. Jen si nejsem jistá, že mě to těší. Na druhou stranu mi už zbývá „jen" 141 dní pobytu, což je méně než 150… Náplní tohoto ďábelského období byla orientace. Marně se snažím pochopit, v čem jsme se měli zorientovat. Abych řekla pravdu, tak už vůbec nevím, kde mi hlava stojí.
Veškeré aktivity byli připraveny jak ve španělštině, tak i v angličtině. Je ale třeba říci, že při hromadných instruktážích pro obě skupiny nakonec vždy přednášející přešel ke španělštině. V některých případech to pak vedení vyřešilo opravdu šalamounsky, poslali nás do tak malé učebny, že se tam půlka zájemců prostě nevešla.
Dalším bodem programu bylo: vyděste ty lidi, co to jde. V čem to spočívá? Byrokracie. Když nevyplníte množství papírů větší než malé, tak budete buď vyhoštěni ze země nebo vás vyhodí ze školy. Ale abych nepředbíhala. Asi nejdůležitější jsou víza. Ty si sice člověk vyřídí již před odjezdem, ale ve výsledku to není žádná výhra. V Mexiku si totiž na imigračním oddělení musíte nechat zapsat trvalý pobyt. A to je oříšek. Nejprve jsme vyplnili formulář pro školu. Po jeho přijetí v příslušné kanceláři si můžeme vyzvednout další sadu dokumentů, které budeme potřebovat. Nejlépe v několika kopiích. Po dvou dnech jsem ještě pořád nic nedostala. Vzhledem k tomu, že na tuto proceduru je vyhrazeno 30 dní a já jsem tu již skoro 10 a nic se neděje, začínám být mírně nervózní. Co se týče pojištění, to by vydalo na krátkou povídku… Jednoduše řečeno: abyste se dostali k těm správným dokumentům, musíte vyplnit další hromadu papírů. Inu, dej blbci funkci a vymyslí lejstro.
Chtěla jsem se ještě věnovat našemu kampusu a kolejím, ale myslím, že to bude lepší nechat až na příště. Třeba zítra, až zjistím, že budu do 3 týdnů deportována.
New versions of two of my plugins: Polyglot and IImage Gallery have been released. Both of them support permalinks.
IImage Gallery should work with permalinks on most servers. On the other hand Polyglot suffers from many WP bugs. Therefore the permalink support is not perfect yet.
Both plugins need a lot of testing now so if you use any of them on your web be so kind and try the latest version.

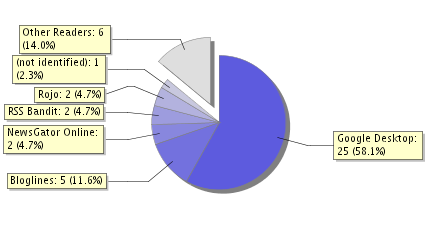
For those who don't know FeedBurner yet – continue to services description. Shortly – you get statistics and some aditional services for your RSS feed for free.

If you use .htaccess file on your web – continue to WordPress FeedBurner Plugin.
The other people (including me) who are not allowed to use .htaccess files by their webhosting company. (So we have to have index.php in the permalink structure of our WordPress powered website.) must employ simple hack to achieve the same result.
http://addressofyourweb/index.php?feed=rss2http://fredfred.net/skriker/index.php?feed=rss2wp-feed.php in the root directory of your site and edit it according to this example:
<?php

if (empty($doing_rss)) {

$doing_rss = 1;

require(dirname(__FILE__) . '/wp-blog-header.php');

}
//this is the code for FeedBurner
if( $wp_query->query =='feed=feed' ){
header("Location: http://feeds.feedburner.com/skriker/");
exit;
}
//end of the added code
where you replace http://feeds.feedburner.com/skriker/ with the address that you've got from the FeedBurner.
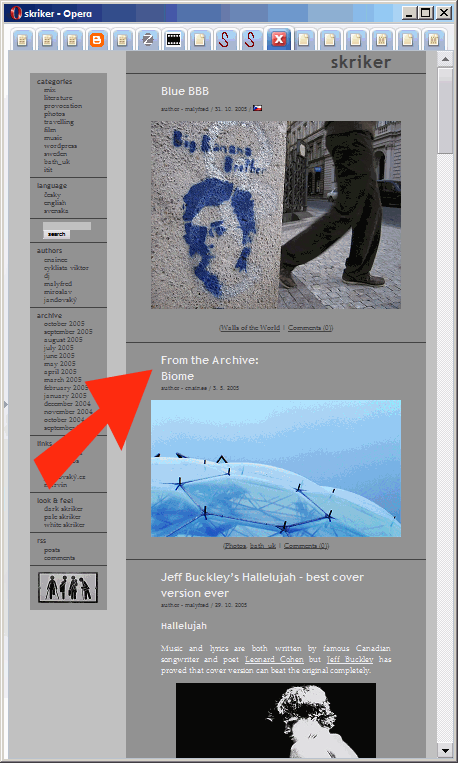
Problem of every blog is that all posts disappear in archive after while and they cannot return back to the front page unless the author changes the publishing date. That’s a cheap trick and we don’t like cheap tricks, right?
So I’ve created Archivist – plugin (for WordPress) that does this job in a nice way.

Copy archivist.php file to your wp-content/plugins directory and activate it.
All these settings can be changed in archivist.php:
'number_of_posts' – number of posts from the archive that should be shown on the front page.
'random' – these posts can be selected randomly or sorted by date.
'frontpage_position' – where should be selected post(s) inserted on the front page. Picture above shows the situation where this value is set to 1. (Archive post is inserted after the first post.)
'from_categories' – it's possible to limit the categories where the post(s) are selected from. Just insert the list of category IDs.
'older_than' – defined in days. E.g. 60.
'newer_than' – defined in days.
'keep_the_limit_of_posts_per_page' – Set to "true" if the very last post(s) on the front page should be "removed" from the this page in order to keep the limit of number of posts per page. Set to "false" if these "removed" posts should be just "moved" futher. Only issue is when set "true" that you will "miss" these "removed" posts on the second page:(
'title' – defines how should be changed the title of selected post(s). There is added "From the archive: " before the title of each post by default.
archivist1.2.zip – (WordPress 2.5 and higher compatible)
Try to type all these characters on your keyboard:
♂∑→€№£§®πξĎÅÑÆ
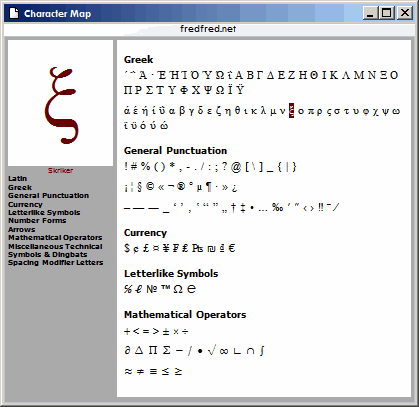
Not easy, right?:) You obviously need new Character Map plugin in your WordPress if you want to use these weird characters in your posts.
After the simplest possible installation (unpack and activate it) – you get the "Character Map" button in the Quicktags area:

New window is opened when you click on this button and the whole new world of never seen characters is waiting for you.

Select the subset in the menu on the left side or turn it off by clicking on the name of the subset (in the menu or above the characters). Enlarged version of character is shown in the top left corner when you put the cursor over the character. Then you have to just click once and selected character is copied to the post text area.
After a long long time – new and quite often requested feature has been added: stand-alone browser for images with link to next/previous image in the gallery.
Try it here:
For more info and download continue to IImage Gallery
This is a right time to realease another nice WordPress plugin, isn't it?
If you would like to see the preview of your post exactly as it looks like on your page (with all formating etc.) before you publish it – JÄÅ Preview plugin is what you need. Because JÄÅ Preview works with all themes!
After installation – you get a new button in your Quicktags area. Just click on it!

New window with your post should be opened. Don't forget that you have to save your post before you click on the "preview" button.
You are allowed to see the preview of the post only if you are logged into the administration of you web and your user level is heigher than the authors level or you are the author of the post.
Unpack preview-plugin.php to your wp-content/plugins directory and activate it.
You should also try these plugins: IImage Browser, IImage Gallery, Polyglot, IImage Panorama
BTW do you know how to pronounce JÄÅ?
No?
Ok – just like this: yaeo:)
23. 05. 2005 – preview.php removed – we don't need it anymore as I have found much smarter way how to do that. Thanks to www.mattread.com
The basic version of IImage Gallery offers only simple custom patterns for generating code. But you can define your own patterns and improve your galleries as you need.
To open full-size image in new window – try something like this:
$ig_before_each = '<a href="%src" onClick="JavaScript:window.open('%src', '%title', 'scrollbars=yes'); return false" class="gallery_item" target="_blank">';
If user has enabled JavaScript – pop-up window without scrollbars appears when he clicks on the image. User without JavaScript support gets new standard browser window with image. Please note that if you want to have your site XHTML valid you have to remove target="_blank". It seems that there is no "valid" way how to open a new window in XHTML without support of JavaScript at the moment .
Example of simplest template page:
<html>

<head>

<title><?PHP echo $ig_img_title;?></title>

</head>

<body>

<?PHP

echo "<img src="$ig_img_src" alt="$ig_img_alt" title="$ig_img_title" /><br />";

echo "<strong>$ig_img_title</strong>";

?>

</body>

</html>
Save this example as gallery.php to the root directory of your WP and then modify $ig_before_each:
$ig_before_each = '<a href="http://addressOfYourSite/gallery.php?ig_img_src=%src&ig_img_title=%title" class="gallery_item">';
To open new browser window with template page you need to combine both examples:
$ig_before_each = '<a href="http://addressOfYourSite/gallery.php?ig_img_src=%src&ig_img_title=%title" onClick="JavaScript:window.open('http://addressOfYourSite/gallery.php?ig_img_src=%src&ig_img_title=%title', '%title', 'scrollbars=yes'); return false" class="gallery_item" target="_blank">';
This example is for a bit advaced users and was provided by A.D.
1. Replace default $ig_before_each with the following:
$ig_before_each = '<a href="#" onClick="openWithSelfMain('%src', '%title', '%width', '%height'); return false" class="gallery_item">';
2. Add commented lines to function "iimage_gallery_create_gallery($text){}" like this:
……….. here: ……………….
$ig_patterns[0] = '/\%src/i';

$ig_patterns[1] = '/\%alt/i';

$ig_patterns[2] = '/\%title/i';

$ig_patterns[3] = '/\%tsrc/i';
/* A.D.'s hack for open-new-imagesized-window */

$ig_patterns[4] = '/\%width/i';

$ig_patterns[5] = '/\%height/i';

/* end A.D.'s hack */
………. and here: …………….
$title = ' ';

$src = $abs_path .md5($matches[$i][1]) .strrchr($matches[$i][1], '.');
/* A.D.'s hack for open-new-imagesized-window */

$im_attr = getimagesize($matches[$i][1]);

$im_width = $im_attr[0];

$im_height = $im_attr[1];

/* end A.D.'s hack */
if(preg_match("/.*?alt="([^"]*)".*?/i",$matches[$i][0],$bar)){
…….. and at last here: ……….
//unset($ip_replacement);

$ig_replacement = array(0 => $matches[$i][1], 1=>$alt, 2=>$title, 3=>$src, 4=>$im_width, 5=>$im_height);
….
3. Create file "yourScript.js" with the following code and put it to Your theme's dir:
function openWithSelfMain(url,name,width,height) {

var options = "width=" + width + ",height=" + height + "toolbar=no, location=no, directories=no, status=no, menubar=no, scrollbars=no, resizable=no, copyhistory=no";
newWindow = window.open(”,”,options);

newWindow.document.open();

newWindow.document.write('<html><title>'+name+'</title><body bgcolor="#CCCCCC" leftmargin="0" topmargin="0" marginheight="0" marginwidth="0" onblur="self.close();" onclick="self.close();"><img src="'+url+'" alt="'+name+'" title="'+name+'"></body></html>');

window.self.name = "Picture";

newWindow.moveTo(((screen.availWidth/2)-(width/2)),((screen.availHeight/2)-(height/2)));

newWindow.focus();

}
4. Include following JS code in your theme's header.php before </head>:
<script language="JavaScript" src="<?php bloginfo('template_directory'); ?>/yourScript.js" type="text/javascript"></script>
5. Create Your gallery.
Full-size image will open centered in new fullimage-sized window.
Window will close "onClick" in Internet Explorer.
Window will close "onClick" or "onBlur" in Firefox.